Cloudflare restore visitor IP address of the end-user in all the server logs by utilizing the header CF-Connecting-IP header.
Cloudflare being the fastest Free DNS provider with a presence in more than 100 countries and one of the most commonly used CDN(Content delivery network). Most of us use Cloudflare as the primary DNS provider or authoritative DNS in place of the default DNS service provided by the domain registrar.
So when we use Cloudflare as the primary DNS provider and have the traffic served through Cloudflare proxy, it helps in masking the original IP address of the server, thereby hiding the original service provider.
This is a handy feature provided by Cloudflare DNS, which is available even in the free plan where Cloudflare will protect your website and server from bots and only pass clean traffic to your servers.
On the downside, Cloudflare, while passing the user traffic it also masks or proxies the original visitor IPs, and your Apache server logs will only show the internal private IP addresses of Cloudflare and not the original visitor IPs. It will look something similar to the image shown below:
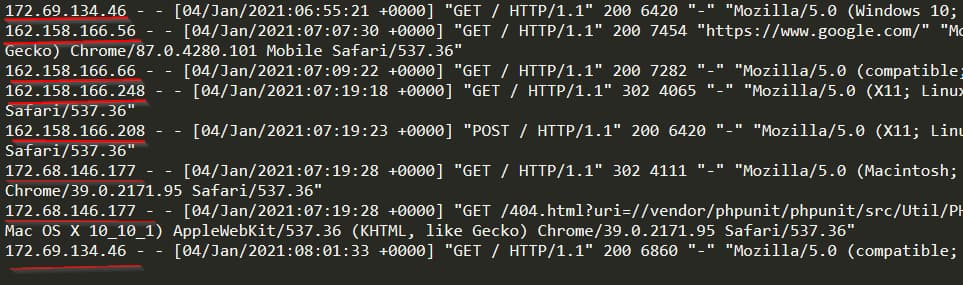
Here the IP addresses highlighted in red are all private internal IP addresses of Cloudflare and not the public IP address of the end-user. The list of Cloudflare IP addresses used internally is given here.
This makes it very difficult when you analyze your server log files or sometimes we restrict admin access to only a specific IP address (for example granting access to admin pages only to a specific range of IP addresses of your home or office). In this case, you will not be able to efficiently have access control based on IP addresses using the Apache directive Require all denied or Require ip 1.1.1.1.
Mod_remoteip, an apache module, can be used along with Cloudflare to restore the original visitor IP in the apache access and error logs. If you are using an apache server, it is effortless to configure the mod_remoteip HTTP header in your apache config file to make the Cloudflare restore visitor IP settings work.
There are two ways of getting the original visitor IP addresses to be logged in apache logs files instead of Cloudflare internal IP address:
Cloudflare restore visitor IP using Mod_cloudflare
As per the latest update, Cloudflare has stopped support for mod_cloudflare from the versions Debian 9 and Ubuntu 18.04 LTS. If you are still interested in installing mod_cloudflare you can compile and build the module from the source code which is available in a git repository (https://github.com/cloudflare/mod_cloudflare).
Cloudflare restore visitor IP using mod_remoteip (Recommended):
Cloudflare has now enhanced support for the mod_remoteip apache module which can be installed and enabled to restore the original visitor IP address in apache server logs.
Below are the detailed steps to enable and configure apache module mod_remoteip to restore visitor IP address in Cloudflare :
Installing mod_remoteip Cloudflare on ubuntu 18.04/20.04
- In order to install or enable mod_remoteip Cloudflare on your Apache web server on Debian or Ubuntu run the below command on the terminal
sudo a2enmod remoteip
- Restart or reload your Apache web server
sudo systemctl restart apache2
- Update the Apache website config file or Apache virtual host configuration file (vhost config) by adding the header added by Cloudflare each time the visitor IP is passed through Cloudflare reverse proxy (RemoteIPHeader CF-Connecting-IP) as shown below
<Virtualhost *:443>
ServerAdmin admin@example.com
DocumentRoot /var/www/public_html
ServerName www.example.com
RemoteIPHeader CF-Connecting-IP
ErrorLog ${APACHE_LOG_DIR}/example_site_error.log
</Virtualhost>- Once your config file is updated, save the updated Apache config file.
- Test your Apache configuration for syntax by running the following command
sudo apache2ctl configtest
- You should get the response as Syntax OK
- Now you can proceed to restart your Apache web server by running the below command
sudo systemctl restart apache2
- Now try accessing your website, you should be able to see the original visitor IP address logged in the Apache access and error logs.
You can also check this Apache documentation on mod_remoteip(https://httpd.apache.org/docs/2.4/mod/mod_remoteip.html)
Cloudflare IP Addresses
List of IPv4 Cloudflare IP addresses
103.21.244.0/22
103.22.200.0/22
103.31.4.0/22
104.16.0.0/13
104.24.0.0/14
108.162.192.0/18
131.0.72.0/22
141.101.64.0/18
162.158.0.0/15
172.64.0.0/13
173.245.48.0/20
188.114.96.0/20
190.93.240.0/20
197.234.240.0/22
198.41.128.0/17
List of IPv6 Cloudflare IP Addresses
2400:cb00::/32
2606:4700::/32
2803:f800::/32
2405:b500::/32
2405:8100::/32
2a06:98c0::/29
2c0f:f248::/32